hello!
OSIER is now retired, however if you are interested in purchasing archival stock please send an email to contact.osier@gmail.com :)

handmade | vintage | home | life | architecture | roller derby | perth
Monday, March 10
retired
Monday, February 23
Lost my URL + Hello!
Hello All,
Now spending most of my internet contribution time on instagram + my architectural website;

Hit me up if you'd like to employ my mad skills at making houses via the contact page.
And my adventures in making things can be followed via my instagram, click on the below awesomeness to visit.
x Lauren

Now spending most of my internet contribution time on instagram + my architectural website;
And my adventures in making things can be followed via my instagram, click on the below awesomeness to visit.
x Lauren
P.S.
Somehow lost osier.com.au, and am pissed off about it.
Will investigate avenues to get it back.
Sunday, June 29
2 More Months @ Montage
So us ladies from Montage Collective are back again, and with only July and August remaining, time is short! Come and visit at 454 William Street, Northbridge! We have some lovely neighbours too in William Topp and Beau est Mien, and there's usually a spot or two of street parking :)
Here's a snapshot of the shop that I've updated my blog header with!

And a shopping list from left to right;
Swan Planter $20
Hand-stitched Heart Card $5
Framed Fabric Ring $23
Black Hand-formed Ring $25
Owl Ring $20
Bullet Earrings $30
Owl Necklace $35
Rose Crown $35
Pin Cushion $20
And if your after one of these but can't make it to the shop, let me know via the contact link on the right and I'll set you up :)
xo Lauren
Wednesday, February 19

Saturday, February 8
DIY mixed drink - matte spray-painted neon-macrame light-bulb planter!
Yes, I went off the deep end and mushed together as many Pinterest trends as I could...
Spray painting things matte black
Neon
Macrame
Light Bulb vases
Hanging Plants!

What you'll need...
1. an old lightglobe - if you're planning on spray painting it like me it can be frosted or clear, but just beware that Australian frosted globes don't seem to just "wash clean" like US ones seem to.
2. spray paint - choose something that will match your string
3. fine sandpaper - you can skip this if you're planning on being extra gentle with your globe for the rest of eternity
4. masking tape or painters tape
5. a small plant, or a cutting. or flowers if you're planning on a vase instead.
6. potting mix
7. everything that the other tutorials I'll link to say that you need, like SAFETY GOGGLES. BE SAFE.
And here's what I did...
1. I cleaned my bulb out of all it's bits as this tutorial told me to
2. I got a stick to act as a handle for spray painting, and after lightly sanding my globe by hand, I used the masking tape to tape off the base of the globe. Not taping anything could be cool too, or just half the bulb, or a faux paint-dip look diagonal, or whatever your sweet little head can come up with!
3. I used that spray paint OUTSIDE to lightly and evenly cover the bulb.
4. I made a super-simple macrame (some would say cheats' macrame, but I say it is knotting string, so it's macrame, so there!) hanger from brickies string using this tutorial. My three strings were 70cm long, and had a knot at 6cm (handle), my first "couples tie" 29cm after that, my second "split the couples" 5cm after that, 4cm was my "couples back together" tie, and all my strings were knotted back together after another 5cm.
Experiment with different lengths between knots, a different amount of start strings (I chose the minimal three as I though the mash-up was quite busy enough already), different amounts of knots (just keep splitting up and putting together the couples - pretend you're a writer of Home and Away episodes, HA.) And of course with different string types - twine is a classic, as is yarn, but all manner of builders and boat supplies are being used at the moment on "the pins" so just use what ever takes your fancy! I like the idea of threading wooden beads in-between knots like in 70's style macrame, but perhaps with a simpler vessel.
5. I squished some potting mix into the bulb, be careful of the broken glass edge! You're welcome to just make a hanging vase of course, but I'm lazy when it comes to refreshing vases so I needed something for my succulent to root into. If you're using a plant that has roots already, its better to only half fill the bulb, rinse the dirt off the plant so the roots can fit through the top of the bulb, then fill over the roots with more soil. Give it a good water in, and then slip the bulb into your hanger!
Then of course its a task of finding a place with enough light to hang your plant - research how much sun your new baby likes, and give it to them!
:) Have fun, Lauren.
EDIT: The wonderful postcard print is by local dude Sean Morris www.illsean.com
Spray painting things matte black
Neon
Macrame
Light Bulb vases
Hanging Plants!
What you'll need...
1. an old lightglobe - if you're planning on spray painting it like me it can be frosted or clear, but just beware that Australian frosted globes don't seem to just "wash clean" like US ones seem to.
2. spray paint - choose something that will match your string
3. fine sandpaper - you can skip this if you're planning on being extra gentle with your globe for the rest of eternity
4. masking tape or painters tape
5. a small plant, or a cutting. or flowers if you're planning on a vase instead.
6. potting mix
7. everything that the other tutorials I'll link to say that you need, like SAFETY GOGGLES. BE SAFE.
And here's what I did...
1. I cleaned my bulb out of all it's bits as this tutorial told me to
2. I got a stick to act as a handle for spray painting, and after lightly sanding my globe by hand, I used the masking tape to tape off the base of the globe. Not taping anything could be cool too, or just half the bulb, or a faux paint-dip look diagonal, or whatever your sweet little head can come up with!
3. I used that spray paint OUTSIDE to lightly and evenly cover the bulb.
4. I made a super-simple macrame (some would say cheats' macrame, but I say it is knotting string, so it's macrame, so there!) hanger from brickies string using this tutorial. My three strings were 70cm long, and had a knot at 6cm (handle), my first "couples tie" 29cm after that, my second "split the couples" 5cm after that, 4cm was my "couples back together" tie, and all my strings were knotted back together after another 5cm.
Experiment with different lengths between knots, a different amount of start strings (I chose the minimal three as I though the mash-up was quite busy enough already), different amounts of knots (just keep splitting up and putting together the couples - pretend you're a writer of Home and Away episodes, HA.) And of course with different string types - twine is a classic, as is yarn, but all manner of builders and boat supplies are being used at the moment on "the pins" so just use what ever takes your fancy! I like the idea of threading wooden beads in-between knots like in 70's style macrame, but perhaps with a simpler vessel.
5. I squished some potting mix into the bulb, be careful of the broken glass edge! You're welcome to just make a hanging vase of course, but I'm lazy when it comes to refreshing vases so I needed something for my succulent to root into. If you're using a plant that has roots already, its better to only half fill the bulb, rinse the dirt off the plant so the roots can fit through the top of the bulb, then fill over the roots with more soil. Give it a good water in, and then slip the bulb into your hanger!
Then of course its a task of finding a place with enough light to hang your plant - research how much sun your new baby likes, and give it to them!
:) Have fun, Lauren.
EDIT: The wonderful postcard print is by local dude Sean Morris www.illsean.com
A long awaited and highly deserved Return to Op-shopping (oh and blogging - hi!)
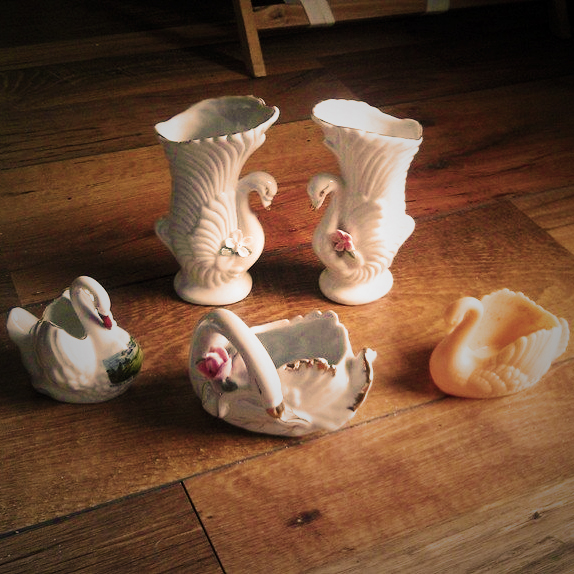
As part of my reward for not op-shopping for about 3 months, I went to my favourite strip in Belmont and went crazy! Over the five-all-next-door-to-each-other adventure, I managed to get some real gems, including these super kitsch teensy swan vessels. The biggest vases at the back are only about 15cm high, and the rest are just for jewellery and Tchotchke's (daym I love that word). They are all very lucky little things as soon they will be filled with adorable succulents and cacti, and apart from the plastic apricot guy on the right (can't part with him!), will be making their way to Osier customers! I'll post here when they're available on my facebook page, and due to there being plants involved, they'll only be available to my local fans here in Perth - sorry dudes!
p.s. I find it hilarious/awkward that the one on the left is a tourist momento from Cronulla... obviously it's back from before the place became famous for all the wrong reasons...
Monday, August 26
Fathers Day is Delicious

had to quickly snap these toffees and brittle before i took them to my dads for gifties!
made from the recipes in frankie magazine's sold out sweet treats book
(which they have recently released a crapple app for which is in turn
making me hopeful that they'll release e-versions for the sold out mags too)
Subscribe to:
Posts (Atom)